In a previous article, we shared the interesting story of how snow globes were accidentally invented. Our readers really seemed to like that article so we want to give you even more on snow globes.Today, we are going to share with you some fun snow globe cookie recipes so you can take Christmas cookie making up a notch this year. Its well known that kids are mesmerized by the magic of snow globes, so it's fair to say they are going to LOVE these magical holiday treats.We have two variations of snow globe cookies to share from Martha Stewart. On is making a cookie in the shape of a snow globe and decorating it with a winter wonderland scene that you would typically find in a snow globe. The other is making snow globe jar with fun cookie scenes inside. Both are unique and would be a memorable activity to do with your kids. So let’s get started. Decorating Snow-Globe Sugar CookiesSource: Martha StewartSupplies
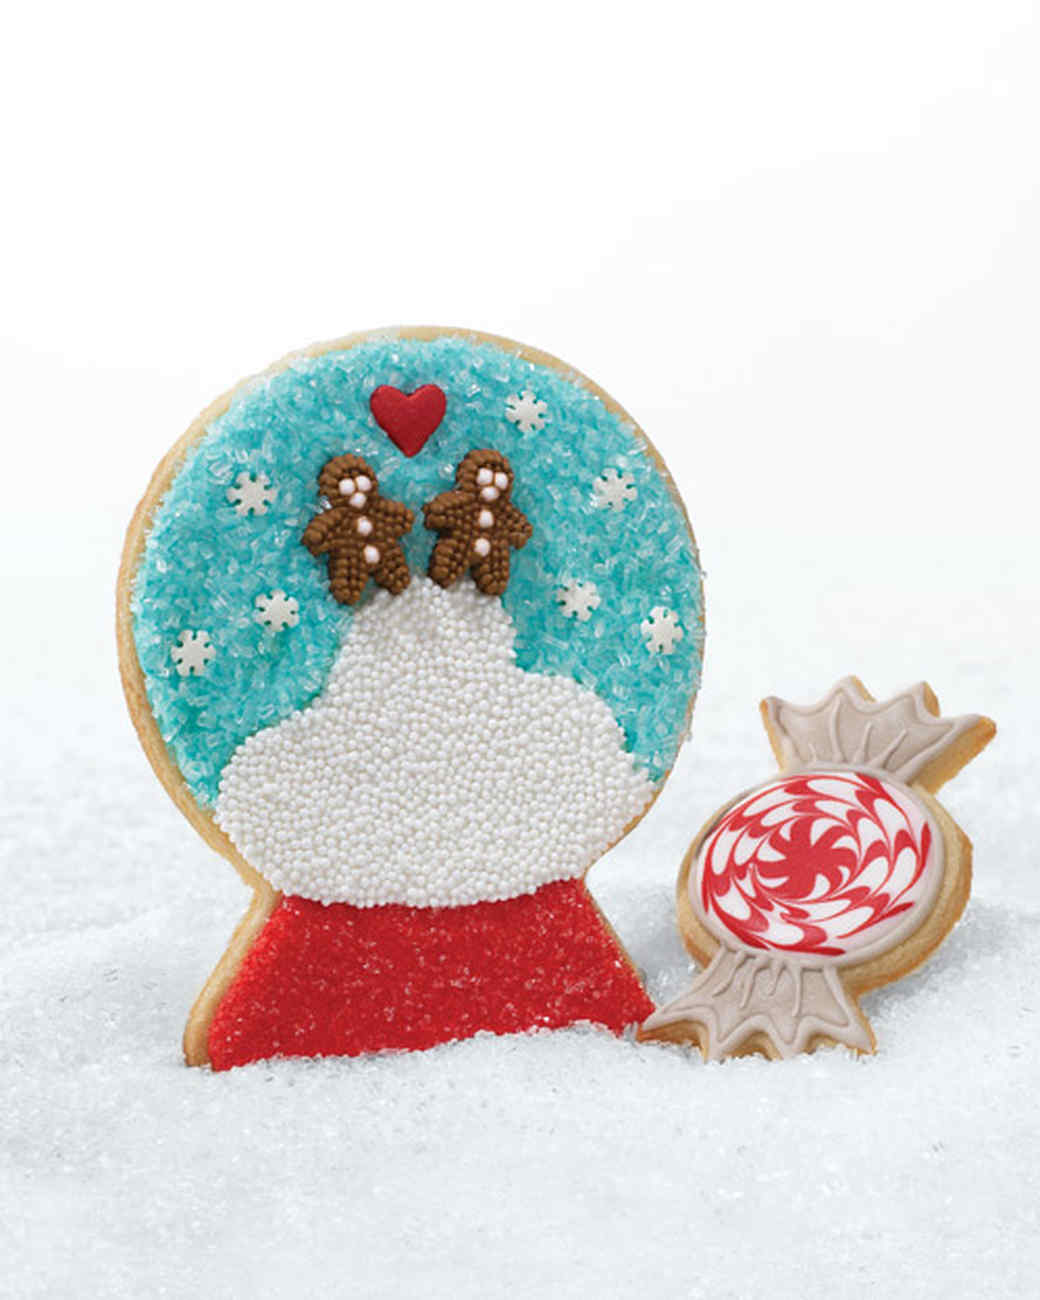
Outline the base using red icing in a squeeze bottle with a wide tip, outline the snow globe's base.
Flood the base by making zigzags with the icing in the base. The icing lines should then melt into each other or "flood" the inside of the base making a smooth icing surface. If it isn’t completely smooth, you can remove the air and fill in any places that need more icing by using a toothpick to spread the icing into the spaces evenly.
Pour fine sanding sugar over the icing, and let dry for 10 minutes. Then shake off any excess sugar.
Make the sky by outlining and flooding the sky area with blue icing. You should now also see the shape of the hill below. Make sure to use an icing spatula to spread the icing, filling in the space.
Add decorations while the blue icing is still wet. First, add the Gingerbread men using craft tweezers to place two candy men on top of the hill (even though the hill isn’t decorated yet). The gingerbread men should stick to the blue sky icing. Then add a candy heart and snowflakes to the sky.
Use coarse sanding sugar to the sky. You can just pour the sugar over the entire sky area and let it set for at least 10 minutes. Try to avoid any sugar getting on the red base area, which still may be wet. After the 10 minutes, gently shake off the excess sugar.
Outline and flood the hill by using a squeeze bottle with a thin tip. First outline the hill with white frosting. Flood the inside of the hill, and use a toothpick to spread the icing evenly to fill the space.
Create the snow on the hill. You can do this by sprinkling white nonpareils over the white icing, avoiding the red base and blue sky. Let it set for 10 minutes.
Finish decorating the cookie by gently shake off excess, holding the cookie sideways to prevent nonpareils from falling onto the other icing colors. Let dry completely, 8 hours or overnight.
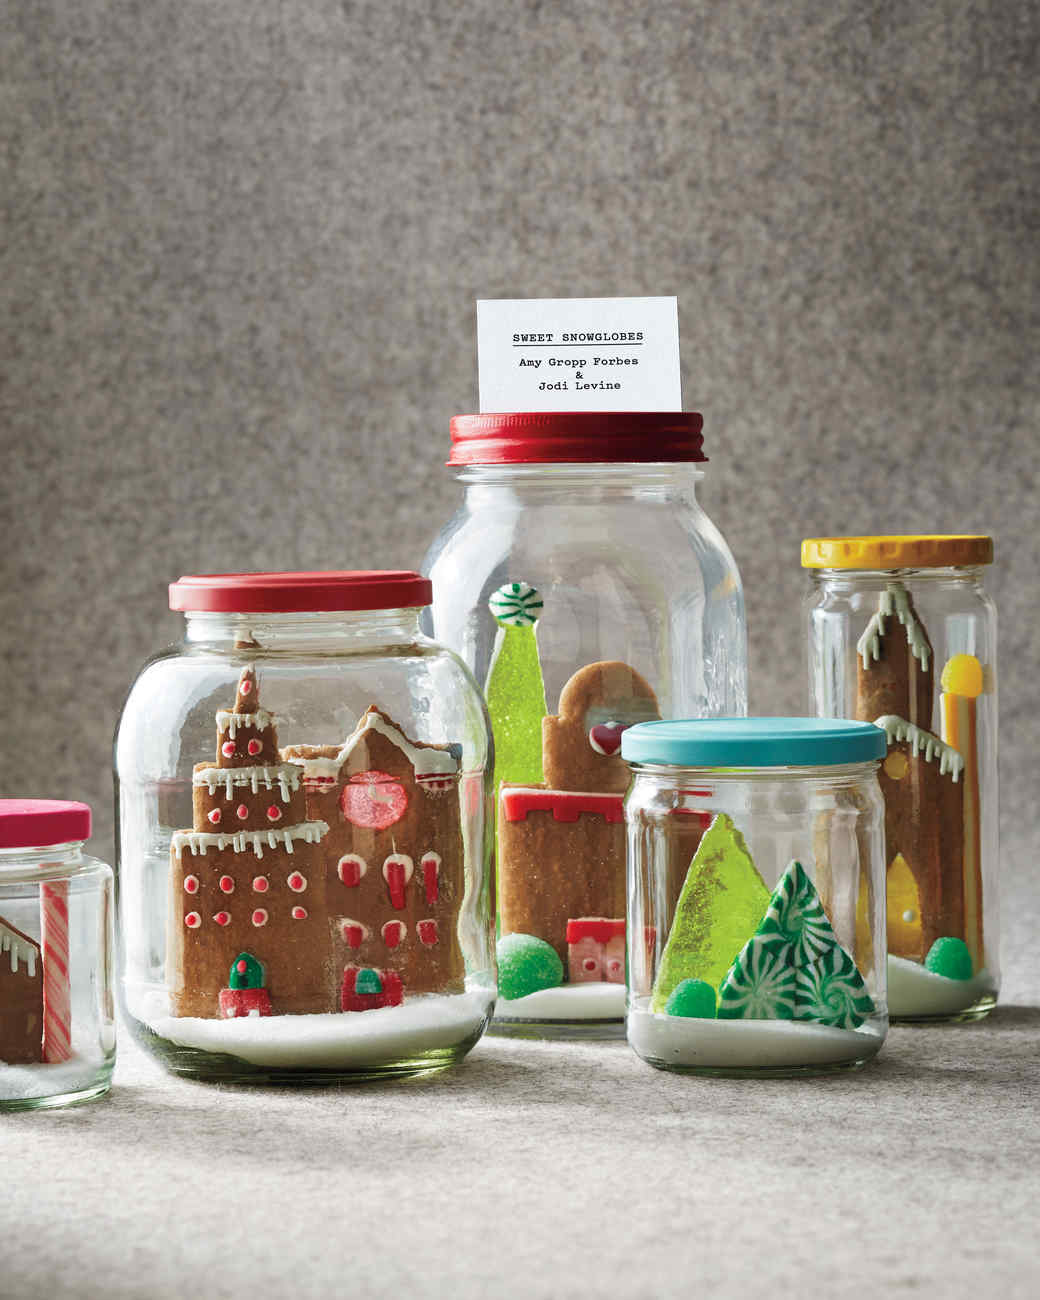
Assorted candies, such as spice drops, sprinkles, sour strips, sticks of gum, candy sticks, wafer candies, and hard candies
Jars with lids
Gesso
Craft paint and paintbrushes
Sugar
Instructions
Make the gingerbread cookie dough (you can use the link above for a good gingerbread recipe).
If you have your own templates for buildings and trees cookie shapes, great! If not, you can use the template link above.
Roll out the dough and then dust it generously with flour. Place one of your templates on top of the dough. Cut around the shape template.
If you want to add a stained glass look to your buildings. Cut out some of the windows or doors in the building cutout you just made. Chill the dough for 30 minutes before putting in the oven.
For those making stained glass cookies, crush up hard candies (jolly ranchers work best) and set aside.
Remove cookies from the oven about 5 to 8 minutes before the end of the baking time. Spread crushed candies evenly in the cutouts where you want the stained glass windows or door and return to oven for the remainder of the baking time or until cookies are firm and candies are melted.
Let cookies cool for 15-30 minutes. Decorate cookies with candies using the royal icing to glue on the building details. Let icing dry overnight.
If you would like to add candy trees to your scene, you will need to melt candies in the oven. First, preheat oven to 275° and then place several hard candies (striped mints make for good pine trees) on a parchment-lined baking sheet. Place the baking sheet in the oven and let it bake until candies soften and melt together. This usually takes 5 to 9 minutes.
Remove candy with the parchment from the baking pan (careful, it will be hot! You may want to use oven mitts for this part). Use scissors to cut into the candy creating a triangular tree shape. Let the candy tree cool, then peel off parchment.
To prep the glass jars, place a dab of gesso on your different jar tops. You can then paint the tops with craft paint and let it dry.
To finish up your snow globe, anchor your cookie buildings and candy trees to the base of the jar using very thick royal icing (with the consistency of toothpaste). You will need to let the icing glue dry thoroughly. This is best done by keeping the lids off for a couple of days. Once everything is glued on, cover the bases with sugar and screw on the lids. You can then decorate the lids with ribbon if you like.

 In a previous article, we shared the interesting story of how snow globes were accidentally invented. Our readers really seemed to like that article so we want to give you even more on snow globes.
Today, we are going to share with you some fun snow globe cookie recipes so you can take Christmas cookie making up a notch this year. Its well known that kids are mesmerized by the magic of snow globes, so it's fair to say they are going to LOVE these magical holiday treats.
We have two variations of snow globe cookies to share from Martha Stewart. On is making a cookie in the shape of a snow globe and decorating it with a winter wonderland scene that you would typically find in a snow globe. The other is making snow globe jar with fun cookie scenes inside. Both are unique and would be a memorable activity to do with your kids. So let’s get started.
Decorating Snow-Globe Sugar Cookies
In a previous article, we shared the interesting story of how snow globes were accidentally invented. Our readers really seemed to like that article so we want to give you even more on snow globes.
Today, we are going to share with you some fun snow globe cookie recipes so you can take Christmas cookie making up a notch this year. Its well known that kids are mesmerized by the magic of snow globes, so it's fair to say they are going to LOVE these magical holiday treats.
We have two variations of snow globe cookies to share from Martha Stewart. On is making a cookie in the shape of a snow globe and decorating it with a winter wonderland scene that you would typically find in a snow globe. The other is making snow globe jar with fun cookie scenes inside. Both are unique and would be a memorable activity to do with your kids. So let’s get started.
Decorating Snow-Globe Sugar Cookies
 Source: Martha Stewart
Supplies
Source: Martha Stewart
Supplies
 Source: Martha Stewart
Supplies
Source: Martha Stewart
Supplies